Visualizzazione post con etichetta International Recipes. Mostra tutti i post

venerdì 17 marzo 2017

La Rubrica del Venerdì: Zaatar - Friday's Page: Zaatar

Le mille e una... spezia!!
One thousand and one... spices!!
La Rubrica del Venerdì: Zaatar - Friday's Page: Zaatar
La Rubrica del Venerdì: Zaatar - Friday's Page: Zaatar 

Mi capita spesso di leggere ricette internazionali e ovviamente mi imbatto in spezie a me sconosciute.
L'ultima volta ho scoperto il sumac, una spezia ricavata dalle bacche di un arbusto della famiglia delle Anacardiaceae, la Rhus Coriara, che cresce al caldo, soprattutto in Medio Oriente e in Sicilia.
Sembra che fosse conosciuta dai Greci e dai Romani, e che fosse utilizzata nel Medioevo, anche se non se ne hanno notizie precise.
Di solito si trova in polvere e viene sparsa direttamente sul pesce o sulla carne, oppure viene sciolta in un pochino d'acqua e poi aggiunta alla preparazione.
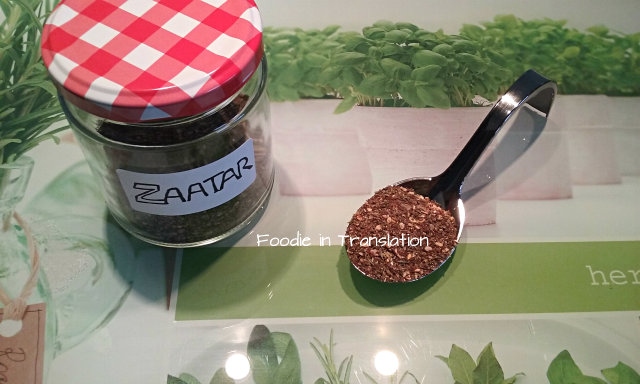
Un'altra cosa interessante è che il sumac serve per creare un mix di spezie tipico della cucina libanese, lo Zaatar, appunto.
In arabo, Zaatar significa timo, che è un altro degli ingredienti di questo mix.
Ma basta parlare, entriamo in azione!!


Zaatar

Ingredienti

2 cucchiai di sesamo dorato
4 cucchiai di timo secco
1 cucchiaio di origano
2 cucchiai di sumac
1 cucchiaino di sale

I often stumble upon some international recipes and I always find some spices I still didn't know.
Last time, I discovered the sumac, a spice made with the seeds of a shrub of the Anacardiaceae family, the Rhus Coriara, which grows in hot areas, mostly in Middle East and in Sicily.
We don't have precise information about it, but sumac was used in the Middle Ages and it seems that Greeks and Romans knew this spice already!
Usually you can find ground sumac to be sprinkled directly on fish and meat, or melted in a bit of water and then added at the preparation.
Another interesting fact, sumac is one of the main components of a typical Lebanese spices mix, the Zaatar, that is the subject of this article.
In Arabic, Zaatar means thyme, another ingredient of this mix.
Enough talking! Let's do it!!


Zaatar

Ingredients

2 tablespoons of sesame seeds
4 tablespoons of dried thyme
1 tablespoon of oregano
2 tablespoons of sumac
1 teaspoon of salt


Mettiamo tutti gli ingredienti nel mixer,
Put all the ingredients in a mixer,


mixiamo
mix everything


e il gioco è fatto!! 😁
and that's it!!😁

La Rubrica del Venerdì: Zaatar - Friday's Page: Zaatar

Enjoy your meal!!
Share This:        
Read More

venerdì 10 febbraio 2017

La Rubrica del Venerdì: Beef brisket with vegetables - Friday's Page: Beef Brisket with vegetables

L'inesperienza... aiuta sempre! :D
Beginner's luck will make your... dinner! :D

La Rubrica del Venerdì: Beef brisket with vegetables - Friday's Page: Beef Brisket with vegetables

Quando ho acquistato questo taglio di carne, pensavo che mi sarei trovata di fronte ad un arrosto come tanti altri, senza pensare che mi avrebbe riservato una bella sorpresa.
Ogni paese sembra avere i suoi personali tagli di carne e quindi non sempre è facile capire cosa abbiamo davanti.
E sta proprio qui il bello!
Come diceva qualcuno: "Il mondo è bello perché è vario!" e direi che questo proverbio si addice perfettamente anche all'ambito culinario.
Non smettiamo mai di ricercare cose nuove, perché il bello della vita sta proprio in questo!
Restiamo fanciullini e godiamo appieno di quello che abbiamo intorno a noi!!
Wow, come sono filosofica e pascoliana oggi :D
Beh, mettiamola così, ho sempre adorato la poetica del fanciullino: guardare il mondo con gli occhi di un bambino e meravigliarci anche delle piccole cose! ;)
In sintesi, appena tolgo dal forno questo brisket, ho avuto parecchi dubbi e il consorte con me ma, una volta capito cosa fare, ci siamo leccati anche i baffi!! ;)


Beef brisket with vegetables - Punta di petto con verdure

Ingredienti per 4

1-1,2 kg di punta di petto di manzo
2 patate
2 cipolle
2 rape
2-3 specchi d'aglio
olio evo
sale
pepe
curcuma
rosmarino
maggiorana

When I bought this cut of meat, I thought I would serve the usual roast beef. However, I didn't know that a big surprise was waiting for me.
Each country has its own primal cut and, when you travel a lot like me, it's not always obvious which cut of meat you are buying.
And this is awesome!
Someone said: "It takes all sorts (to make a world)!" and I think this proverb perfectly applies to the culinary field as well.
Never stop looking for new things, because this is what makes life beautiful!
Do not repress the inner child inside you, let's enjoy life!!
Wow, I pretty much feel philosophical right now and I am thinking about the famous Italian poet Giovanni Pascoli :D
Well, I always loved Pascoli's poetic of "The Eternal child": look at the world with the eyes of a child and get stunned by it! ;)
Long story short, once I remove this brisket from the oven, I was doubtful about it and so was my partner but, as soon as we understood what to do with that cut, we totally licked our fingers!! ;)


Beef Brisket with vegetables

Ingredients for 4

1-1,2 kg beef brisket
2 potatoes
2 onions
2 turnip
2-3 garlic cloves
extra-virgin olive oil
salt
pepper
turmeric
rosemary
marjoram


Mettiamo la carne in una teglia da forno, inseriamo l'aglio pelato nelle fenditure e condiamo con sale, pepe, curcuma, rosmarino, maggiorana e olio.
Preriscaldiamo il forno a 180°C e inforniamo la carne coperta con l'alluminio per circa 30 minuti.
Tuck the peeled garlic inside the meat and season it with salt, pepper, turmeric, rosemary, marjoram and olive oil.
Preheat the oven at 180°C and put the meat, covered with foil, into it for about 30 minutes.


Nel frattempo puliamo le cipolle, le patate e le rape e condiamole con sale, pepe e olio.
Meanwhile, clean onions, potatoes and turnips, dice them coarsely and season with salt, pepper and olive oil.


Trascorsa mezz'ora di cottura, tiriamo fuori la carne, togliamo l'alluminio, aggiungiamo le verdure, abbassiamo a 150°C la temperatura e cuociamo per circa 3-4 ore.
After 30 minutes cooking, remove the meat from the oven, remove the foil, add the vegetables, low the temperature at 150°C and bake for 3-4 ore.


Togliamo dal forno, lasciamo riposare la carne,
Remove from the oven, let the meat rest,


poi, aiutandoci con due forchette, sfilacciamola.
Portiamo in tavola e...
then, using two fork, shred it.
Serve it and...


... Enjoy the brisket!!
Share This:        
Read More

venerdì 30 dicembre 2016

La Rubrica del Venerdì: Gallineta a la espalda - Friday's Page: Gallineta a la espalda

Chiudiamo l'anno in bellezza!!
End the year in style!!

La Rubrica del Venerdì: Gallineta a la espalda - Friday's Page: Gallineta a la espalda

Siete alla ricerca di un piatto di pesce originale da portare in tavola per il Cenone di domani?
Ecco allora una bella ricettina spagnola che farà sicuramente un figurone!
È una preparazione molto antica e diffusa soprattutto nelle zone costiere, che permette di assaporare appieno il gusto autentico del pesce.
Questa preparazione richiede l'uso di pesci medio-grandi, come il merluzzo, l'orata, il besugo o lo scorfano.
È un piatto che presenta molte varianti, ma ha due caratteristiche fisse: la presentazione del pesce e il condimento.
Attenzione: il pesce va semplicemente aperto a libro, testa compresa, senza togliere la lisca centrale.
È indispensabile pulirlo benissimo: sia esternamente, togliendo accuratamente tutte le squame, che internamente, non lasciando alcuna traccia delle interiora.
Ora, siete pronti a scoprire il condimento tipico di questo piatto?
Allora andiamo direttamente alla ricetta!! 😜


Gallineta a la espalda - Scorfano rosso a la espalda

Ingredienti per 2:
2 scorfani rossi
1 pomodoro
1/2 cipolla
3 patate
2 spicchi d'aglio
aceto bianco
sale
pepe
timo
olio evo

Are you looking for a special seafood dish for the New Year's Eve dinner?
There you go! A wonderful Spanish recipe that will look great in the middle of the table!
A traditional way to cook seafood, very popular in coastal areas that allows you to taste the authentic flavor of the fish.
A medium-big fish, such as cod, sea bream or red scorpionfish, is ideal for this kind of cooking.
This dish can present a lot of variations, but two factors are fundamental: the seafood presentation and the final seasoning.
Warning: you need to butterfly the fish, including the head, without taking away the fishbone.
It must be cleaned perfectly: leave no scales outside nor any guts inside.
Now, are you ready to discover the final seasoning?
Well, let's move to the recipe!! 😜


Gallineta a la espalda - Red scorpionfish a la espalda

Ingredients for 2:
2 red scorpionfishes
1 tomato
1/2 onion
3 potatoes
2 garlic cloves
white vinegar
salt
pepper
thyme
extra-virgin olive oil


Tagliamo sottilmente il pomodoro, la cipolla e le patate.
Thinly slice the tomato, the onion and the potatoes.


Disponiamo le patate su una teglia rivestita di carta forno creando tante file parallele.
Dispose the potatoes on a baking pan lined with parchment paper in parallel rows.


Distribuiamo sopra la cipolla e condiamo con sale, pepe, timo e olio.
Inforniamo in forno già caldo a 180°C per circa 10 minuti.
Scatter the onion and season with salt, pepper, thyme and olive oil.
Put into a preheated oven at 180°C for about 10 minutes.


Tagliamo i pesci a metà usando un coltello affilato.
Cut the fishes in halves using a sharp knife.


Togliamo la teglia dal forno, aggiungiamo il pomodoro e i pesci, condiamo con sale, pepe e olio e inforniamo di nuovo per circa 15-20 minuti, in base alle dimensioni dei pesci.
Remove the pan from the oven, add the tomato and the fishes, season with salt, pepper and olive oil and put again into the oven for about 15-20 minutes, depending on the sizes of the fishes.


Nel frattempo prepariamo il misterioso condimento 😆
Affettiamo l'aglio e facciamolo rosolare in abbondante olio.
Meanwhile let's prepare the mysterious seasoning 😆
Slice the garlic and let it brown in abundant olive oil.


Aggiungiamo l'aceto, lasciamo cuocere un altro paio di minuti e togliamo dal fuoco.
Fatto! Piaciuto il condimento? 😁
Add the vinegar, cook for a couple of minutes and remove from the heat.
Done! Did you like it?😄


Togliamo la teglia dal forno e impiattiamo.
Irroriamo il pesce con il soffritto di aglio, olio e aceto e portiamo in tavola!!
Remove the baking pan from the oven and dish up.
Pour the seasoning over the fish and serve it!!


¡¡Buen Provecho!!
Share This:        
Read More

venerdì 16 dicembre 2016

La Rubrica del Venerdì: Rhubarb muffin - Friday's Page: Rhubarb Muffin

Facciamo il pieno di zuccheri!! 😁
Brimful of sugar!!😁

La Rubrica del Venerdì: Rhubarb muffin - Friday's Page: Rhubarb Muffin

Oggi è una giornata uggiosa: in realtà fuori c'è il sole, ma per me è uggioso lo stesso.
Mi sento stanchissima, anche se ho dormito come un ghiro e non sono andata a letto tardi... e pensare che la giornata di ieri mi ha dato una carica inattesa: ho scoperto di avere le idee più chiare di quello che pensavo!! 😉
Data la stanchezza odierna direi che c'è bisogno di zuccheri e quindi... dolceeeee!!! 🍰
Sarà mica che la stanchezza è una scusa per mangiare zuccheri!!?? 😝
E siccome è venerdì usiamo un prodotto che da noi è poco comune, ma che io adoro: il rabarbaro! 😋


Rhubarb muffin - Muffin al rabarbaro

Ingredienti per 12 muffin

250g di farina di farro
125g di burro
2 uova
150g di zucchero di canna vanigliato (potete trovare qui la ricetta)
1/2 bustina di lievito per dolci
110ml di latte
15g di sciroppo di rabarbaro (potete trovare qui la ricetta)
1 pizzico di sale
200g polpa di rabarbaro (ottenuta preparando lo sciroppo di rabarbaro)

Today is a dreary day: outside it's sunny actually but I feel dreary anyway.
Even if I slept like a log and I went to bed early, I feel so tired... and think that yesterday was a fantastic day that gives me an unexpected strength: I found I had a very clear idea about what I want!!! 😉
Considering my current weariness, let's put it in this way... I need sugar!!! 🍰
By any chance is this weakness an excuse to eat sugar!!?? 😝
It's Friday, so I will use an ingredient not so known in Italy but that I love: rhubarb!! 😋


Rhubarb muffin

Ingredients for 12 muffins

250g spelt flour
125g butter
2 eggs
150g vanilla brown sugar (you can find here the recipe)
1/2 baking powder
110ml milk
15g rhubarb syrup (you can find here the recipe)
1 pinch of salt
200g cooked rhubarb pulp leftover from syrup recipe


In una ciotola piccola mescoliamo farina, zucchero, lievito e il sale.
Mix the flour, sugar, baking powder and salt in a small bowl.


In una ciotola grande mescoliamo le uova, il burro precedentemente sciolto e fatto raffreddare, il latte e lo sciroppo di rabarbaro.
Whisk the eggs, the butter melted and cooled, the milk and rhubarb syrup in a big bowl.


Uniamo gli ingredienti secchi con quelli liquidi,
Combine di dry ingredients with the liquids one,


aggiungiamo la polpa di rabarbaro e mescoliamo delicatamente.
add the rhubarb pulp and gently stir.


Mettiamo i pirottini nella teglia per muffin, distribuiamo il composto e spolveriamo la superficie di ogni muffin con lo zucchero di canna.
Put the fluted paper cases into the cup muffin tin, divide the batter into the cups and sprinkle brown sugar over each muffin.


Cuociamo in forno già caldo a 180°C per circa 25 minuti o finché i muffin non saranno belli dorati e non supereranno la prova dello stecchino, che dovrà uscire asciutto.
Bake in a preheated oven at 180°C for about 25 minutes or until the muffins are golden brown and check for doneness using a toothpick, which should come out clean.


Sforniamo, facciamo raffreddare ed ecco pronti dei gustosissimi muffin!!
Remove them from the oven, let them cool and these delicious muffins are ready to serve!!


Enjoy the muffins!!
Share This:        
Read More

venerdì 2 dicembre 2016

La Rubrica del Venerdì: Pommes de terre Duchesse - Friday's Page: Pommes de terre Duchesse

Ancora una volta... patate!! ^_^
Potatoes... once again!! ^_^

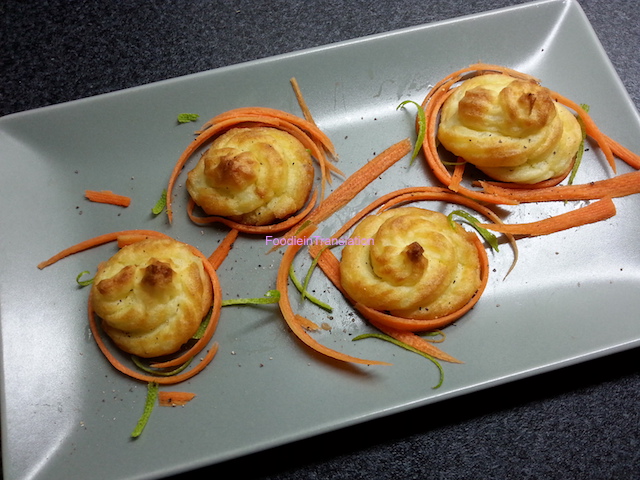
La Rubrica del Venerdì: Pommes de terre Duchesse - Friday's Page: Pommes de terre Duchesse

Chi mi segue sa già che adoro le patate in tutte le declinazioni: arrosto, fritte, lesse...
Oggi prepariamo questa ricetta francese che può servire sia da antipasto che da contorno per carni rosse o per pesci.
Una preparazione molto semplice, ma che vi farà portare in tavola una pietanza molto chic, croccante all'esterno e morbida all'interno.
Tutti ne andranno matti!! 😉
Bisogna solo seguire due accorgimenti: usare patate rosse, perché sono più farinose, e lavorare l'impasto ancora caldo, così da dare la forma giusta senza problemi.
Vi chiederete da dove venga il nome "pommes de terre duchesse" o "patate duchessa" se vogliamo dirla all'italiana... beh non si sa!
A occhio direi che si trattasse in origine di una leccornia inventata per una duchessa! 😁


Pommes de terre Duchesse - Patate duchessa

Ingredienti per 4:
4 patate rosse
60g di burro
3 rossi d'uovo
sale
pepe

My followers know I love potatoes, in every single way: roasted, fried, boiled...
Today I will prepare a French recipe, a starter or a side dish for red meat or fish.
A very simple preparation which will allow you to serve an elegant potato side dish, crunchy on the outside and soft on the inside.
Everyone will go crazy for these potatoes!! 😉
You only need to follow two rules: use red potatoes, because they are more floury, and put the mixture inside the piping bag when it is still warm, so you won't have problems to shape them.
Who was the person who named to these "pommes de terre duchesse" or "duchess potatoes" if we prefer their English translation... who knows!
My guess... a delicacy for a duchess! 😁


Pommes de terre Duchesse - Duchess potatoes

Ingredients for 4:
4 red potatoes
60g butter
3 egg yolks
salt
pepper


Peliamo le patate, tagliamole a tocchetti e lessiamole in acqua salata per circa 20 minuti.
Nel frattempo accendiamo il forno a 200°C.
Peel the potatoes, cut them into chunks, place them in a big saucepan, cover with cold salted water and boil for about 20 minutes.
In the meanwhile, preheat the oven at 200°C.


Quando le patate saranno morbide, scoliamole, rimettiamole nella pentola e schiacciamole con uno schiacciapatate.
Once the potatoes are tender, drain them, put them back into the saucepan and mash with a masher.


Rimettiamole sul fuoco, aggiungiamo 40g di burro,
Put the saucepan over low heat again, add 40g of butter,


un tuorlo di uovo alla volta e mescoliamo finché il composto non si staccherà dalle pareti della pentola.
incorporate one yolk at a time and stir until the mixture comes away from the sides of the saucepan.


Aggiustiamo di sale e pepe, poi inseriamo il composto in un sac à poche con il beccuccio a stella.
Add salt, if needed, and pepper, then put the mixture in a piping bag with a star piping tip.


Creiamo una sorta di rosette di medie dimensioni su una teglia rivestita di carta forno.
Pipe some round mounds onto a baking pan lined with parchment sheet.


Facciamo sciogliere il burro restante e versiamone un po' sopra ogni rosetta.
Melt the rest of the butter and put on top of each mound.


Inforniamo per circa 15 minuti e quando le nostre pommes duchesse saranno belle dorate,
Put into the pre-heated oven for about 15 minutes and once the pommes duchesse are nicely browned,


sforniamo e portiamo in tavola! ;)
remove from the oven and serve them! ;)


Bon Appétit!!
Share This:        
Read More

venerdì 28 ottobre 2016

La Rubrica del Venerdì: Codornices en escabeche - Friday's Page: Codornices en Escabeche

È sempre la stessa storia! :)
It's always the same! :)

La Rubrica del Venerdì: Codornices en escabeche - Friday's Page: Codornices en Escabeche

Ogni volta è sempre la stessa storia!
Le cucino, mi ricordo quanto siano buone e mi dico che la prossima volta dovrò cucinarne di più... e invece no, è una sorta di circolo vizioso! :D
Ho la memoria troppo corta! ^_^
Sto parlando di quel piccolissimo ma delizioso volatile che prende il nome di... quaglia!
Ha un gusto così delicato che non smetteresti mai di mangiarne e finora in qualsiasi modo io l'abbia cucinata... il risultato è sempre stato un piatto prelibato!
Non appena ho visto questa ricetta spagnola, non ci ho pensato due volte e così eccomi qua a proporvi questa leccornia ispanica!


Codornices en escabeche - Quaglie in escabeche

Ingredienti per 2:
2 quaglie
3 foglie alloro
3 spicchi d'aglio
1/4 bicchiere di aceto di mele
1/2 bicchiere di olio evo
sale
pepe

It's always the same!
Whenever I cook them, I remember how good they are and I say to myself that next time I had to cook more quails... but it never happens! :D
Short memory! ^_^
I am talking about a little but delicious bird called... quail!
It has so delicate a taste that, once you start, you can't stop eating.
I tried a lot of recipes with quails and every time we had an exquisite dish!
As soon as I saw this Spanish recipe, I knew that would be our next dinner and here I am with this fantastic Hispanic delicacy.


Codornices en Escabeche - Quails in escabeche

Ingredients for 2:
2 quails
3 bay leaves
3 garlic gloves
1/4 glass of apple vinegar
1/2 glass of extra-virgin olive oil
salt
pepper


Controlliamo che le quaglie non abbiamo piume residue.
Saliamole e pepiamole.
Make sure that the quails are perfectly clean, without residual feathers.
Season with salt and pepper.


Tagliamo gli spicchi d'aglio a metà e mettiamoli in una padella con l'olio, l'aceto di mele, le foglie di alloro e le quaglie.
Cut the garlic gloves in halves and put them into a pan with the olive oil, the apple vinegar, the bay leaves and the quails.


Cuociamo a fuoco alto finché non inizia a sobbollire.
Copriamo con un coperchio, abbassiamo e lasciamo cuocere per circa venti minuti, girando le quaglie di tanto in tanto.
Quando le quaglie risulteranno cotte, togliamole dal fuoco e portiamole in tavola.
Cook at a high heat until the oil starts to simmer.
Cover, reduce the heat and cook for about twenty minutes, turning the quails around from time to time.
Once the quails are cooked, remove them from the heat and serve.


¡Buen provecho!
Share This:        
Read More

venerdì 21 ottobre 2016

La Rubrica del Venerdì: Vietnamese Spring Rolls - Friday's Page: Vietnamese Spring Rolls

Nuove scoperte culinarie! :D
New culinary discoveries! :D

La Rubrica del Venerdì: Vietnamese Spring Rolls - Friday's Page: Vietnamese Spring Rolls

Dopo tante riflessioni, ho finalmente trovato il coraggio di cimentarmi con questa ricetta asiatica.
Dal momento che avevo dei gamberetti freschissimi, non ho trovato altre scusanti e mi sono buttata nell'impresa :D
Anche se gli involtini non erano così stretti come avrebbero dovuto (credo!) ci sono piaciuti moltissimo e visto che erano tutte verdure o quasi diciamo che abbiamo fatto un favore anche alla bilancia! (se non consideriamo la salsa usata per intingere questi involtini dietetici...) :D
Il procedimento non è complicato, se si esclude il fatto che i fogli di riso sono delicatissimi da maneggiare.
La preparazione richiede un pochino di tempo, ma il risultato è stato talmente soddisfacente che è valsa la pena attendere un po'! ;)
After thinking a lot about it, I finally decided to deal with this asiatic recipe.
I had some very fresh shrimps, so I had no excuses and just started working on it :D
Even if the rolls were not as tight as required (or so I think!) we love them so much and because there were almost only vegetables let's say we did our shape a favour! (if I avoid mentioning the sauce we dipped them into...) :D
The process is not complicated, with the exception of the rice paper, so delicate to handle.
The preparation requires a bit of time, but the result was so good it was worth the wait! ;)


Vietnamese Spring Rolls - Involtini Primavera Vietnamiti

Ingredienti per 12 involtini:
2 carote
1 peperone
1/2 zucchina
1/2 cetriolo
2 coste di sedano
1 cipollotta fresca
prezzemolo fresco
100g di vermicelli di soia
100g di fogli di riso (12 fogli)
48 gamberetti freschi

Per la salsa:
maionese
salsa di soia
salsa di ostriche
salsa di pesce
aceto di riso
prezzemolo
Vietnamese Spring Rolls

Ingredients:
2 carrots
1 green peppers
1/2 zucchini
1/2 cucumber
2 celery stalks
1 spring onion
fresh parsley
100g soy vermicelli
100g rice paper (12 papers)
48 fresh shrimps

For the sauce:
mayonnaise
soy sauce
oyster sauce
fish sauce
rice vinegar
fresh parsley


Tagliamo tutte le verdure a bastoncino e il cipollotto a rondelle.
Cut all the vegetables into sticks and cut the spring onion into rounds.


Cuociamo i vermicelli in acqua bollente per il tempo indicato nella confezione,
Cook the soy vermicelli in boiling water for the time indicated in the box,


scoliamoli e lasciamoli da parte.
drain them and set them aside.


Nella stessa acqua lessiamo i gamberetti (per il procedimento vedere qui), peliamoli e mettiamoli da parte.
Usiamo sempre la stessa acqua per ammorbidire i fogli di riso, che hanno bisogno solo di acqua calda.
Boil the shrimps in the same water (you will find the procedure here), peel them and set aside.
Soften the rice paper using the same water. They need hot water only.


Mettiamo il foglio di riso su un piatto.
Put the rice paper on a plate.


Nella parte più a destra del foglio mettiamo le verdure
Put the vegetables on the right side of the paper


e posizioniamo sopra un po' di vermicelli di soia e un rametto di prezzemolo.
then a bit of soy vermicelli on top of them and a branch of fresh parsley.


Al centro del foglio mettiamo 4 gamberetti,
Put 4 shrimps in the middle,


arrotoliamo partendo dall'estremità a destra e ripieghiamo sotto l'involtino le due estremità finali, in modo che non fuoriesca nulla. Il primo involtino è pronto!! ^_^
roll it out from the right extremity and fold the ends in, in order not to let anything come out. The first spring roll is ready!! ^_^


Continuiamo nello stesso modo finché non termineranno i fogli di riso.
Continue in the same way until the rice papers are finished.


Ora è tempo di preparare la salsa!
In una ciotola mettiamo tutti gli ingredienti (non ho messo le quantità perché dipendono dai gusti personali),
Now it's sauce time!
Combine all the ingredients in a bowl (I did not mention the quantities because they depend on personal taste),


mescoliamo e la salsa dove intingere i nostri involtini è pronta!
stir and the dipping sauce for our spring rolls will be ready in no time!


Thưởng thức nem của bạn!*
Enjoy your spring rolls!

*la traduzione potrebbe essere approssimativa :)
*the translation might be inaccurate :)
Share This:        
Read More